Yesterday I posted the first part to this article, GW Woods Project: The Base. Today I am following up with how I painted the trees for the bases and will end by showcasing the final product. So I am just gonna jump right in and stop wasting time.
As with the bases I started by cleaning the flash from the models. Once cleaned the trees have to be glued together. There are several locations to glue on branches so I tried my best to randomize the branches on each of the trees. After the trees have been glued together it was time for primer. Unlike the bases it took several coats to get the trees ready. The branches were particularly a pain but after about 3 coats I had the trees primed and ready for painting.
I wanted the trees to match the roots from the bases, so again I started with GW Bestial Brown. I used a heavy dry-brush to cover every part of the tree. Some of the base coat still showed, but this was fine with me as it would just add in as a layer of shadows. I also ensured that I got the roots. I wasn't careful over the rocks as I knew I was going to have to hand paint those later on in the project. Each base holds three trees so after completing nine, I was ready to go back and begin highlighting.
Just like with the roots I did a dry-brush highlight over the entire tree with GW Snakebite Leather. This step really starts to make the bark stand out. I was careful to get more of the elevated highlights leaving the darker brown and black colors in the recesses for base and shadows. Finally I added a dry-brush of GW Codex Grey just like I did with to roots.
The next step was painting on the rocks. Since the roots overlapped the rocks I had to hand paint GW Codex Grey, instead of dry-brushing. Once the rocks were painted, I applied GW's Badab Black wash to give some shadows. Once that was completed I carefully dry-brushed Vallejo Stonewall Grey as the first highlight layer of the rocks. After that was complete I did a light dry-brush of GW Skull White. Finally I painted some small details such as the ropes on the trees.
Since the trees were finished with paint, I used a spray sealant on them and waited for it to dry. Once dry it was time to apply some GW Scorched Grass static flock to the base of the trees. I used the same technique as the bases with a 50/50 mix of PVA glue and water. I applied the flock in-between the roots and on any bare sections of the base.
The final step for completing the tress was attaching some foliage. I chose not to use the plastic leaves that come with the model set. Instead I decided to go with Woodland Scenic's Fall Foliage bag. It had the colors I was looking for and I think it looks more realistic than the plastic leaves that came with the model. I glued clumps of foliage to the branches using straight PVA glue. I tried to be as random as possible about placing the colors and over all i am happy with the result.
Once I added the trees to the bases I added smaller clumps of foliage under the trees to represent fallen leaf piles.
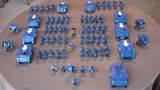
Below is the final picture of the complete project. I know have three sets of woods to use for terrain and they turned out even better than I had hoped for. As always thank you for reading my blog and all feedback is welcome.


.jpeg)


1 comments:
As I said in your 40K blog, they look very cool!!
I'll keep your pics from the woods in mind for when I have some.
Kee up the good work! ;D
Post a Comment