Meatball on Twitter

Sunday, June 27, 2010

Project Update: Cygnar Charger Light Jack!

Today I finished the Charger Light Jack for my buddy Mike's Cygnar Army. I kept to his painting wishes by including white as the secondary color for the model.  The only yellow I used was the the Cygnar icon.

With this model I am now finished with all of the Jacks that my buddy owns. I will now be moving on to his casters. I am hoping with luck to have all of his minis painted by the end of July.

Once his army is done I will then start some heavy work on my Protectorate of Menoth force. I am very happy with how my Crusader turned out so I am really looking forward to getting paint on more of my models.


As always thank you for reading the blog and please feel free to leave a comment or two.

-BJ

Saturday, June 26, 2010

Storm Wardens Project: GO CHECK IT OUT!


In case you haven't heard, there is a really awesome project going on between the following blog sites.


Thomas Wynn ( Wynn Studios)


Ron Saikowski (From the Warp)

Mister Justin (Secret Weapon Miniatures)

Mik (Miks Minis, Barter Bucket)

Mike & John (Santa Cruz Warhammer)

To quickly summarize what is going on, these fine blogs are working together to build and paint a Storm Warden Space Marine army. This army is then going to be given to a randomly selected contestant. You can become one buy donating money to the Doctors Without Borders charity. The more you donate the more times your name will be entered in the contest. To top it off they are having weekly prizes for all contestants to win some cool swag, and you still get a chance at the army even if you win a weekly drawing.

To learn more about the project please visit Santa Cruz Warhammer, and to see how the army is progressing check out all of the blogs listed above.
-BJ


Project Update: Dwarfs are finished!

Well today was a very productive day as I managed to finish the final 6 Dwarfs for my Dwarf army. The first up is a Dwarf Hero that no longer has rules printed and I can't remember his name, but I loved the model so I kept it around, I may just use him as a cool looking musician.


Next up are my two Rune Priests. Since they are the same model I decided to paint them as different as possible. I still used the army colors but just switched it up a bit to make them two distinctly different priests. I am sorry for the shadow I waited too late in the day to take these pictures.


Finally up last is my Engineering Corps. The first one is an older model that I have had laying around. The other two are the newer engineers that came out when the new Dwarf book arrived. I really love all three miniatures and had the most fun painting them.


Well that is it, my Dwarf army is now complete. I will get to work on making a full army post sometime in the next week. Now I have two finished armies, just in time for the release of 8th Edition Fantasy Battles. Now my next question is do I move onto painting my Vampire Counts or do I work on my Orcs to give them a much needed updated paint job and basing. The Orcs would probably give me another finished army in a short time, but I have really been looking forward to painting my Vampires. I will let you know what I decide soon.

As always thanks for taking the time to read my blog, and please fell free to leave me a comment or two.

-BJ


Thursday, June 24, 2010

Project update: Crusader Heavy Jack

I just finished painting the first model for my Protectorate of Menoth Warmachine army. I have been painting my friend Mike's Cygnar army and I felt like my minis were crying for some attention so I decided to give them some.

I am mostly going with the standard Menoth colors except I am going with an off white instead of the pure white. Allot of the art I have seen for Menoth seems to be more of an off white so that is what I chose to go with. I was a little heavy with the wash so on my next model I will definitely be addressing that.

Over all I am very happy with the outcome and can now envision how the rest of my force will look with these colors. Thanks for taking the time to read the blog and please fell free to leave a comment.

Monday, June 21, 2010

Project Update: Sister of Battle Immolator

Last night I completed my first Sisters of Battle vehicle, the Immolator. I really like this model and painting it was fun. It is mostly the same as a Rhino but it has some extensions that give it more of a Gothic Temple feel.

I painted it in the same colors as my Order of the Valorous Heart's army scheme. I used black as the primary color with white and red as the secondary colors.


The other thing I like about this kit is it came with the bits to make it into a Rhino. The only complaint I have is the plastic window shields. They look great painted but it is difficult to paint plastic without any primer. The paint went on streaky and was easy to accidentally pull off with my fingers. I ended up having to paint small parts then allow it to fully dry before moving on to paint. This was one of the most time consuming aspects of this model.

In the end I am really happy with the results and I can't wait to see it in action the next time I play my Sisters. I still have another Immolator, an Exorcist and 2 Penitent Engines before my army is finished.

Thanks for stopping by and please fell free to leave a comment.

-BJ

Sunday, June 20, 2010

GW Newsletter: Incoming! The Island of Blood

I just got my GW Newsletter announcing the Island of Blood box game incoming for Warhammer Fantasy 8th edition. Below is a quick quote from the Newsletter.

"The Island of Blood is the new boxed game for Warhammer and is released this September. Packed full of stunning plastic Citadel miniatures and containing all the rules, dice and templates you'll need to play, it's the essential purchase for fans of the Warhammer hobby."

Unfortunately it doesn't mention what armies or models will be included but it did contain the below image which leads me to believe the High Elf/Skaven rumors are true.


So let me know what you think. I know I will be getting this set if it has High Elves as I am planning to build a High Elf army in the near future.

-BJ

Saturday, June 19, 2010

Making Icons with Greenstuff

I have been looking for a way to get some Imperial Fists icons for my Terminators. Of course as always I turned to the wonderful internet for some advice and found the following tutorial Green Stuff Casting. I am posting below on how this process worked for me.

The first part of the process was finding a suitable icon that would fit on a Terminator shoulder. I chose to use the top of the banner that I stole from the Crimson Fists' Pedro Cantor. This banner now resides on my Company Captain. I held it up to a terminator shoulder and it looked to be a good match


For the next step I found a round an empty round base and put a thin layer of greenstuff on it. You really have to pay attention to the thickness of the greenstuff. My first attempt made the icons way to think and they just looked silly once applied to the terminator.

Once I had the green stuff applied, I smeared the top with petroleum jelly to prevent the icon from sticking. Next I pressed the icon from the standard into the green stuff in 4 different locations. Once I was satisfied I then let the greenstuff cure overnight.


Before I get into the next step, I also discovered something about greenstuff I didn't know. I took what was left of the mixed greenstuff from making the mold and I placed it in the freezer over night while the mold was curing. I always put my unmixed greenstuff in the freezer to store because I was told it makes it last longer, so I thought I would see if the cold would stop it from curing. I was very excited when after thawing the greenstuff was good to go. No more wasted greenstuff for me.

Ok so I took my now thawed greenstuff and my mold. Fist I used the petroleum jelly again to lubricate the mold. Next, I tore off small bits of greenstuff and pressed it into the mold. You can see the final products to the right. I then allowed the icons to sit for about 90 mins.


After waiting the 90 mins, I carefully cut away the excess greenstuff using my hobby knife. I then applied the icon to the shoulder pad of each of my Terminators. I probably could have still gotten them a bit thinner, but I actually like the look. These guys are veterans and would have the larger iconography. When I compared it to their crux terminatus on their left shoulder, they seemed to stick out just as far so I left it.


I was so happy with the results that I decided to do another mold so that I could add a smaller fist symbol to the Heraldry shield. Now my Terminators all have their icons. My next project is to attempt this tutorial on Icons for Shoulder Pads. I will post again to let you know how that turns out.

Thank you for taking the time to read my blog. Please fell free to leave me a comment.

-BJ

Tuesday, June 15, 2010

Monday, June 14, 2010

Lancer Light Jack finished

Here is the 3rd Jack I have completed for my friend Mike's Cygnar army. I used white as the primary color for the Lancer with the blues as a secondary and yellow as a minimal 3rd color.

The smaller jacks are not as detailed as the larger ones so this guy didn't take much time to paint. I have been having a blast painting the Warmachine mins and I am just aching to get some paint on my Menoth models, so I primed my Crusader and will hopefully get to painting it soon.

As always thanks for taking the time to stop by my blog and please feel free to leave a comment.

-BJ


Wednesday, June 9, 2010

Tavern Talk: Army Theme


For this month's tavern talk collaborative post this is what we received as the topic. How important do you view the theme of an army when writing your lists, assembling your army or painting them?  Is it a small trifling thing that you pay little attention too or is it some big arching theme you have carefully planned or spread through your entire army?  If you do theme then, how do you achieve it?  Why did you choose that theme?  Since I had already discussed this topic on my 40K blog I decided to just re-run the article here on The Winds of Magic.


In general there are 3 ways that I create a unified theme for my armies aside from using army composition. The first is when selecting the color scheme for my army. The second is when deciding how I am going to base the army. The last one is using some form of iconography or other extra detail that can tie the theme together.


In the image above I am showing two different ways of how I achieved a unified theme with 3 different units from my Dwarf army. The first of these unifying elements is the use of two colors, a burgandy red and polished gold. If you notice these two colors appear on every model in each unit. They can be used on small or large section of the model. For instance the heavily armored Ironbreakers in the middle have both colors appearing on their shields. Similarly, my dwarf lord with shield bearers had the red appearing on the shield but it also seen on the bearer's helmets, while the gold is used on numerous details as the entire model. Lastly with my bolt thrower crew the red makes a dominant appearance in the color of the war machine as well as the crew clothing and the gold once again shows up on many of the details.


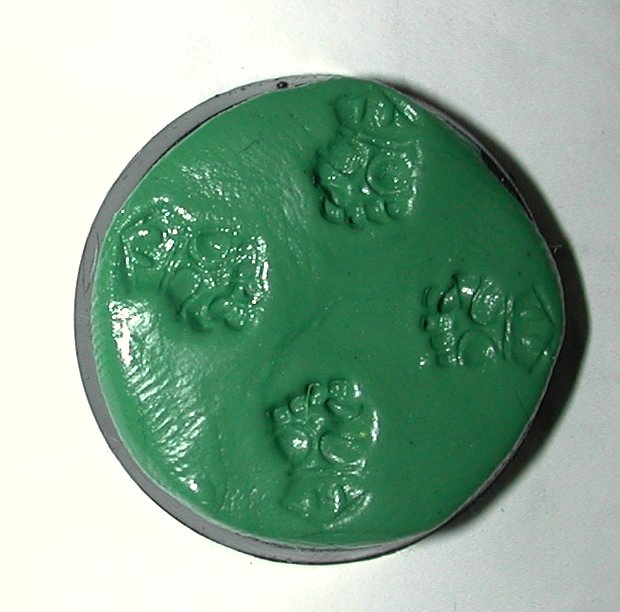
The second method I have used to unify this army is the material and colors used to base the models. When doing an army I will stick to using the same material and colors throughout. I also will take down notes so that in the future when I added models to the army I know exactly what material I used to get the bases looking the same. With my Dwarfs I used cat litter that was based in Chaos Black then drybrushed with layers of codex gray, fortress gray and finally skull white.


With some armies, especially in 40k, you may already have a unified color scheme, but that doesn't prevent you from making your army stand out from others of the same type. This is where I will use Iconography or other extra details to make armies like my Black Templars look unified but still stand out from other Black Templar armies.


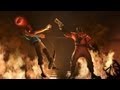
The image to the left is the heraldry for the Kilburne Crusade, otherwise know as my Black Templars army. I tried to keep it very simple so that I could easily duplicate it on my models with paint or decals. Throughout my entire Templar force I have used the iconography to tie the army together in a unified theme.


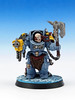
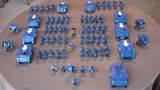
In the image above you can see how I managed to get the heraldry on several of my vehicles. While in the image below I show examples of how I fit the heraldry onto my Marshal as well as a crusade squad unit. The round knee pads are particularly good for using the heraldry colors on.


I have also used a similar technique on my Orcs and Goblins for Fantasy Battles. There I used red tattoos as well as red war paint to unify the army. I plan to do the same with my Orks for 40k only using blue tat and warpaint. The option are only limited by your creativity.


Well there you have it, those are the three main ways I choose to use to give my army a unified theme. I would love to hear or see some examples of how others accomplish this. As always thanks for taking the time to read my thought. I welcome any and all comments, so please feel free to leave them.


Till next time,


-BJ

Tuesday, June 8, 2010

Honoured Imperium Terrain Tutorial


I just wanted to show off my Honoured Imperium pieces. I am not posting a tutorial per say, but I am going to link the GW tutorial  Honoured Imperium: Painting stage-by-stage. I used the first part of the article, Painting Tarnised Metal. I followed the tutorial pretty closely excepts i did a very heavy wash to add the tarnish because I wanted my models to look even more tarnished than the examples they did. I am very happy with the results.

Thank you for taking the time to read my blog. Please feel free to drop me a comment or two.

-BJ

Monday, June 7, 2010

Orks Vs. Chaos Marines


I got a game of 40K in this weekend and boy did it prove that I need to start playing more. My buddy Reed came over with his Space Orks and managed to table me by turn 4.

Reed played his Blood Axe Orks against my Disciples of Tzeentch Chaos Marines. This is not going to be a full battle report, I am just posting some of the pictures we took (there would be more pics but we get so involved in the game we forgot) while playing a fun filled game. I will also talk about some of the crazy moments of the game.


This was Reeds Tournament list and his orks were very deadly. What amazed me even more is he didn't use any of the typical power units such as Nobz Bikers or a Battlewagon full of Burna Boyz. My Tzeentch Chaos Marines are an army in transition from 4th to 5th and soem of my changes worked wonderfully and I am happy with how the army is progressing even though I got tabled.


I had some Epic Fail moments such as when my Daemon Prince attacked a Trukk of boys. I managed to destroy the truck, but the Ramshackle roll was a  Kareen and moved the trukk 14" behind me, and furthermore none of the Orks took an injury. This left my Daemon Prince unprotected and susceptible to a tankshock from the Battlewagon. My Daemon Prince did a "death or glory" against the Battlewagon promptly rolled two 1's. Apparently my lord Tzeentch was punishing him for his failure with the Trukk.

Another huge failure of mine was with my Terminators. I teleported them on the table to strengthen my right flank that was being over run by Ork Boss Zagstruk and his Stormboyz. I rolled horribly on thier shooting and then completely forgot that Combi-bolters are twin linked. Then the next ruen when the Orks assaulted me I couldn't make my 2+ saves or my 4+ invul when I needed too and the unit got wiped out.

My final major failure was when my Chosen outflanked and came in on my right flank within striking distance of the Deff Dread, I fired 3 meltas and only managed to remove 1 of its 4 CCWs. The next turn the Dread then slaughtered the chosen.


It wasn't all doom and gloom for me though as I did have one shining moment and it came from my Aspiring Sorcerer. After taking an assault from the Warboss and his Nobz, my Aspiring Sorcerer ended up being base to base with the Warboss whom he managed to slaughter using his force weapon. Unfortunately it wasn't enough and Reed easily won the game a turn later.


In the end we had a great game. Any time you can be tabled and still have a blast is a great game to me. We had some very cinematic moments in the game and Reed is a great guy to play against competitively or just for fun like we did on Sunday.

As always, thank you for reading my blog and please fell free to leave a comment.

-BJ

Cyclone Jack Finished!

I finished another Jack for my buddy Mike this weekend. I am pretty happy with how the model turned out so far. I used the same colors as I described in the My 1st Painted Warmachine Jack post (see the post for details).

I want to give each Jack a unique look for his army. With his Ironclad I used blue as the primary color with white and the secondary and yellow in very small amounts. With his Cyclone, I went with White and Blue as equal primary colors with a secondary of yellow being a more prominent color than on his Ironclad.

I also got to paint my first Icon fora wargaming model. For years I have relied on decals but no more, after practicing drawing the Cygnar icon several times on a piece of paper, I was able to draw it on the model then fill it in with paint. This is a real milestone for me and one I am pretty excited about.

As always, thanks for stopping by my blog and please feel free to comment.

-BJ