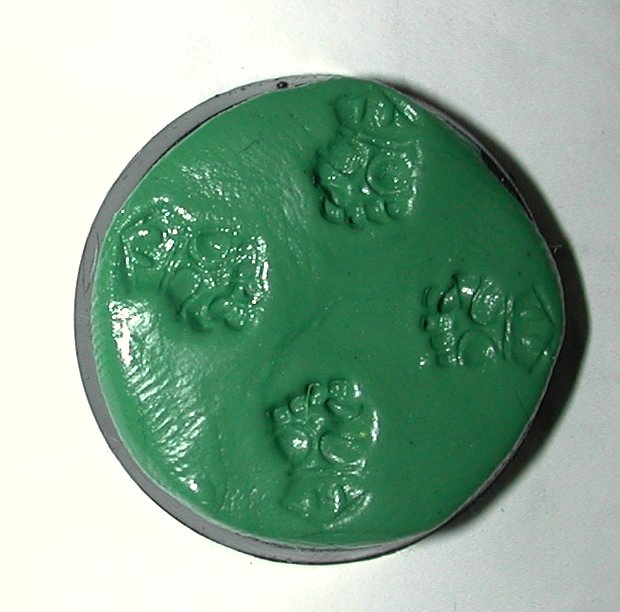
I found this great tutorial, Green Stuff Casting (On Shoulder Pads), from the Ferrus Manus blog. This is exactly what I was looking for to do my Imperial Fist army. I followed the exact steps in their tutorial and got the following results.
I am very excited with the results, Over the last two days I have done 40 Tactical Icon pads and about 20 Fist Icon pads (I already had some metal ones). I should be able to finish my last two Tactical Squads later this evening.
Anyway, that is an excellent tutorial and I just wanted to show off what I did using it. Thanks for stopping by the blog and please fell free to leave a comment.
-BJ
Meatball on Twitter
Showing posts with label Tutorials. Show all posts
Thursday, July 1, 2010
Saturday, June 19, 2010
Making Icons with Greenstuff
I have been looking for a way to get some Imperial Fists icons for my Terminators. Of course as always I turned to the wonderful internet for some advice and found the following tutorial Green Stuff Casting. I am posting below on how this process worked for me.
The first part of the process was finding a suitable icon that would fit on a Terminator shoulder. I chose to use the top of the banner that I stole from the Crimson Fists' Pedro Cantor. This banner now resides on my Company Captain. I held it up to a terminator shoulder and it looked to be a good match
For the next step I found a round an empty round base and put a thin layer of greenstuff on it. You really have to pay attention to the thickness of the greenstuff. My first attempt made the icons way to think and they just looked silly once applied to the terminator.
Once I had the green stuff applied, I smeared the top with petroleum jelly to prevent the icon from sticking. Next I pressed the icon from the standard into the green stuff in 4 different locations. Once I was satisfied I then let the greenstuff cure overnight.
Before I get into the next step, I also discovered something about greenstuff I didn't know. I took what was left of the mixed greenstuff from making the mold and I placed it in the freezer over night while the mold was curing. I always put my unmixed greenstuff in the freezer to store because I was told it makes it last longer, so I thought I would see if the cold would stop it from curing. I was very excited when after thawing the greenstuff was good to go. No more wasted greenstuff for me.
Ok so I took my now thawed greenstuff and my mold. Fist I used the petroleum jelly again to lubricate the mold. Next, I tore off small bits of greenstuff and pressed it into the mold. You can see the final products to the right. I then allowed the icons to sit for about 90 mins.
After waiting the 90 mins, I carefully cut away the excess greenstuff using my hobby knife. I then applied the icon to the shoulder pad of each of my Terminators. I probably could have still gotten them a bit thinner, but I actually like the look. These guys are veterans and would have the larger iconography. When I compared it to their crux terminatus on their left shoulder, they seemed to stick out just as far so I left it.
I was so happy with the results that I decided to do another mold so that I could add a smaller fist symbol to the Heraldry shield. Now my Terminators all have their icons. My next project is to attempt this tutorial on Icons for Shoulder Pads. I will post again to let you know how that turns out.
Thank you for taking the time to read my blog. Please fell free to leave me a comment.
-BJ
The first part of the process was finding a suitable icon that would fit on a Terminator shoulder. I chose to use the top of the banner that I stole from the Crimson Fists' Pedro Cantor. This banner now resides on my Company Captain. I held it up to a terminator shoulder and it looked to be a good match
For the next step I found a round an empty round base and put a thin layer of greenstuff on it. You really have to pay attention to the thickness of the greenstuff. My first attempt made the icons way to think and they just looked silly once applied to the terminator.
Once I had the green stuff applied, I smeared the top with petroleum jelly to prevent the icon from sticking. Next I pressed the icon from the standard into the green stuff in 4 different locations. Once I was satisfied I then let the greenstuff cure overnight.
Before I get into the next step, I also discovered something about greenstuff I didn't know. I took what was left of the mixed greenstuff from making the mold and I placed it in the freezer over night while the mold was curing. I always put my unmixed greenstuff in the freezer to store because I was told it makes it last longer, so I thought I would see if the cold would stop it from curing. I was very excited when after thawing the greenstuff was good to go. No more wasted greenstuff for me.
After waiting the 90 mins, I carefully cut away the excess greenstuff using my hobby knife. I then applied the icon to the shoulder pad of each of my Terminators. I probably could have still gotten them a bit thinner, but I actually like the look. These guys are veterans and would have the larger iconography. When I compared it to their crux terminatus on their left shoulder, they seemed to stick out just as far so I left it.
I was so happy with the results that I decided to do another mold so that I could add a smaller fist symbol to the Heraldry shield. Now my Terminators all have their icons. My next project is to attempt this tutorial on Icons for Shoulder Pads. I will post again to let you know how that turns out.
Thank you for taking the time to read my blog. Please fell free to leave me a comment.
-BJ
Labels:
Tutorials
Tuesday, June 8, 2010
Honoured Imperium Terrain Tutorial
I just wanted to show off my Honoured Imperium pieces. I am not posting a tutorial per say, but I am going to link the GW tutorial Honoured Imperium: Painting stage-by-stage. I used the first part of the article, Painting Tarnised Metal. I followed the tutorial pretty closely excepts i did a very heavy wash to add the tarnish because I wanted my models to look even more tarnished than the examples they did. I am very happy with the results.
Thank you for taking the time to read my blog. Please feel free to drop me a comment or two.
-BJ
Labels:
Tutorials
Monday, March 15, 2010
GW Woods Project Completed!
I posted a two-part article on how I painted my GW woods. It can be found over on my Warhammer Fantasy Blog at the following links.
GW Woods Project: The Base
GW Woods Project: The Trees
GW Woods Project: The Base
GW Woods Project: The Trees
Monday, August 10, 2009
Flaming Sword for Tzeentch Lord

OK this was going to be a tutorial showing exactly how I did this conversion but only 4 of my pictures were worth posting. I will go into as much detail as I can on how I did the conversion and strive to take better pics next time, or at least double check their quality at each stage.
I had originally made this model as a Tzeentch Sorcerer Lord but decided I wanted to run a list with a Tzeentch Lord wielding the Deathscreamer. Since One of the descriptions of the Deathscreamer was as a sword of fire, I decide that I could convert this mini in a way that he could be a Lord with the Deathscreamer or a Sorcerer Lord with a Force Weapon.
As you can see I had already started painting the mini before I made this decision so I had to remove the staff that he was originally holding and find a suitable blade to build the Deathscreamer with. I found a bit on my Chaos Knights sprue that had a cool shape and a daemon face on it. I removed the blade from the knight hand, then I removed a grip and pommel from an axe on the
same sprue. Next I took my time and lined up the sword how I wanted it. I then pinned and glued it in place. I didn't pin the grip and pommel and opted to just glue it on, a mistake I would come to regret later.I apologize for not having any pics of the next few steps. Next I rolled a thin log of greenstuff and applied it to the edge of the sword where I wanted the fire. I then made the basic path I wanted the flames to travel up the sowed and even off the edge. This had no detail at all it was a template, flat on both sides of the sword with the basic area I wanted the flames to go. I set the model aside and allowed the GS to cure over night.
The next step was to begin sculpting the flames on one side of the blade. I rolled 3 small balls of putty and placed one at the base of the sword. Using my sculpting tool I then began to shape the flames by dragging the tool up and out away from the base of the sword and using my GS template as a guide for where the flames would travel. I continued to
make flames until the ball of GS ran out. I then grabbed the 2nd and 3rd ball of GS and continued sculpting the flames up the inside of the sword. Once I was happy with the basic flame shapes I then went back and sculpted in more details.
make flames until the ball of GS ran out. I then grabbed the 2nd and 3rd ball of GS and continued sculpting the flames up the inside of the sword. Once I was happy with the basic flame shapes I then went back and sculpted in more details. During this stage I went on the Internet and found pictures of flames. I had these up on my monitor while I sculpted the details of the flames. Once I was done I set the model aside to allow it to cure.
The next day I repeated the same step to the outer side of the sword, the only difference this time is I had to blend the flames together with the inner side that I had done in the last step. Once that was all finished I set the model aside again allowing the GS to cure.
If you take a close look at the last pic, you can see where I broke of the bond holding the grip and pommel.
I cursed myself for not pinning it and then proceeded to pin the damn thing in place.
I cursed myself for not pinning it and then proceeded to pin the damn thing in place.I enjoy doing conversions that allow me to use the model in a few different ways. With this model the weapon will easily work as either a force weapon on a Sorcerer Lord of a Daemon weapon on a Lord.
Now the model it built and I can get to painting it. I have not decided yet but I am leaning towards either blue or green flames on the sword. Green would really stand out and I have used it on the weapons in other parts of my Tzeentch army, but in my head blue keeps looking like a good choice.
As always thanks for taking the time to look over my blog. All comments and feedback are welcome. I wish this could have been a better tutorial but hey I learned from it and I will do better next time.
-BJ
Thursday, July 23, 2009
Cobblestone base tutorial
I had found this tutorial for making cobblestone bases with greenstuff. It is a fairly easy concept I know but the guy at In Sanguin Veritas has it down to step by step. I thought this might be good for anyone out there who is just getting into using greenstuff. I knocked out about 40 of cobblestone bases today for my Vampire Counts army and they look great.
Here is the link to the tutorial. Cobblestone Base Tutorial
Labels:
Tutorials
Saturday, July 4, 2009
Painted Iconography or Decals?
This is a question that has plagued me since I started the hobby. I personally suck at hand drawing and painting icons, but decals were limited to what was provided and never quite looked right once applied. So as I often find myself doing, I turned to the web for help.Luckily I found this great tutorial for Custom Decal Sheets on Bell of Lost Souls. Not only was the tutorial right on about how to make your own decal sheets, it also opened my eyes to some wonderful products called Decal Solvents. The tutorial recommended Micro-Sol and Micro-Set but there are various ones on the market available to you.
This little tutorial has really helped me improve the looks of my armies. Once I got the supplies all I did was fire up Paint Shop Pro (any graphics program will do) and a quick surf of the web for "Black Templars" provided me with many images I could use for my models. I picked out the best ones and made a few combinations and soon I had my very own decal sheet ready to print off.
Now it is important to follow all of the steps in the tutorial, you don't want to forget to spray your decal sheet with the High Gloss finish. Let me repeat... you don't want to forget to spray your decal sheet with the High Gloss finish. It is also important to know if you will need clear decal paper or white.
The solvents were the truly incredible thing for me. They make your decals soft so they better adhere to non-flat surfaces. Even on a flat surface they help the decal stick better and you end up with much less if any air under the decal. This gives the decal that painted on look and the results are awesome.

If you struggle with painting on icons for your minis, I hope you will find the tutorial as useful as I did. I have included a few images of my models so you can see the results that you can get. If you have any questions or need any help please feel free to let me know.
Labels:
Tutorials
Subscribe to:
Posts (Atom)
Blog Archive
-
▼
2011
(109)
-
▼
September
(11)
- Project Update: Warmachine, Goblins, and a Rhino
- Motivational Monday: Deff Rollas
- Project Update: IG Tanks and Heavy Weapons
- Motivational Monday: Rules Lawyers Take 2
- 911 - Never Forget!
- Project Update: Warmachine and Malifaux
- My Armies: Miners and Steamfitters Union
- Project Update: Ragnar Blackmane, Imperial Fists a...
- Motivational Monday: The Necrons want you!
- Sisters of Battle White Dwarf Codex Review
- Project Update: First Malifaus Mini and First atte...
-
▼
September
(11)