


OK this was going to be a tutorial showing exactly how I did this conversion but only 4 of my pictures were worth posting. I will go into as much detail as I can on how I did the conversion and strive to take better pics next time, or at least double check their quality at each stage.
I had originally made this model as a Tzeentch Sorcerer Lord but decided I wanted to run a list with a Tzeentch Lord wielding the Deathscreamer. Since One of the descriptions of the Deathscreamer was as a sword of fire, I decide that I could convert this mini in a way that he could be a Lord with the Deathscreamer or a Sorcerer Lord with a Force Weapon.
As you can see I had already started painting the mini before I made this decision so I had to remove the staff that he was originally holding and find a suitable blade to build the Deathscreamer with. I found a bit on my Chaos Knights sprue that had a cool shape and a daemon face on it. I removed the blade from the knight hand, then I removed a grip and pommel from an axe on the
 same sprue. Next I took my time and lined up the sword how I wanted it. I then pinned and glued it in place. I didn't pin the grip and pommel and opted to just glue it on, a mistake I would come to regret later.
I apologize for not having any pics of the next few steps. Next I rolled a thin log of greenstuff and applied it to the edge of the sword where I wanted the fire. I then made the basic path I wanted the flames to travel up the sowed and even off the edge. This had no detail at all it was a template, flat on both sides of the sword with the basic area I wanted the flames to go. I set the model aside and allowed the GS to cure over night.
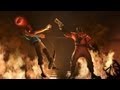
The next step was to begin sculpting the flames on one side of the blade. I rolled 3 small balls of putty and placed one at the base of the sword. Using my sculpting tool I then began to shape the flames by dragging the tool up and out away from the base of the sword and using my GS template as a guide for where the flames would travel. I continued to  make flames until the ball of GS ran out. I then grabbed the 2nd and 3rd ball of GS and continued sculpting the flames up the inside of the sword. Once I was happy with the basic flame shapes I then went back and sculpted in more details.
 make flames until the ball of GS ran out. I then grabbed the 2nd and 3rd ball of GS and continued sculpting the flames up the inside of the sword. Once I was happy with the basic flame shapes I then went back and sculpted in more details.
 During this stage I went on the Internet and found pictures of flames. I had these up on my monitor while I sculpted the details of the flames. Once I was done I set the model aside to allow it to cure.
The next day I repeated the same step to the outer side of the sword, the only difference this time is I had to blend the flames together with the inner side that I had done in the last step. Once that was all finished I set the model aside again allowing the GS to cure.
If you take a close look at the last pic, you can see where I broke of the bond holding the grip and pommel.  I cursed myself for not pinning it and then proceeded to pin the damn thing in place.
I cursed myself for not pinning it and then proceeded to pin the damn thing in place.I enjoy doing conversions that allow me to use the model in a few different ways. With this model the weapon will easily work as either a force weapon on a Sorcerer Lord of a Daemon weapon on a Lord.
Now the model it built and I can get to painting it. I have not decided yet but I am leaning towards either blue or green flames on the sword. Green would really stand out and I have used it on the weapons in other parts of my Tzeentch army, but in my head blue keeps looking like a good choice.
As always thanks for taking the time to look over my blog. All comments and feedback are welcome. I wish this could have been a better tutorial but hey I learned from it and I will do better next time.
-BJ


.jpeg)


2 comments:
That looks very nifty!
Great greenstuff work on the flames! As well as blue or green flames, I think that white flames would also provide a good contrast colour ... but white flames might be a pain to get looking right.
Post a Comment